Commodore Amiga Retro
![]()
Please remember that text for pages was originally
written for my Amiga 1200 to read... so thin paragraphs
Creating an AmigaGuide Document
Just how do you do that ?
Introduction
Masterclass Tutorial
`You`ve probably seen them, you`ve probably used them - now
John Kennedy explains how to write them: AmigaGuide documents.`
This AmigaGuide is for the screen grabbing software
that I use to capture these images.
OK I`m gonna take this one slowly OK. Cus I want to learn how to do
this also. I have written AmigaGuide docs in the past, but like so
many things, I got to grips with the basics and just left it at
that. So over the next few days I will endeavour to post the guide
from CU Amiga from Jan 95 on the AmigaGuide.
First thing.... when you see the @ command do not assume this to be a
link to the web. Just ignore the colour change if it happens. Also
you need amigaguide.library in Libs and amigaguide in C. also
amigaguide and amigaguide datatype inDevs:datatypes...If anyone
wants those then shout.
And so here we go.......
AmigaGuide can be used simply as a text display system, but when you
start to use the embedded command codes you can do all sorts - from
making on-line help files to interactive stories and even adventure games.
Writing your own AmigaGuide document is easy, but the first thing to
make sure of is that you have the AmigaGuide display program, or
you`ll be wasting your time. Hunt around your Workbench 3.0 disks
for it, and make sure the Amigaguide datatype is installed - this
way you can use Multiview to examine your documents.
If you don`t have Workbench 3 hunt around for anything that says
AmigaGuide on some of your existing software. When running it
looks like a form of browser with buttons for moving around a
document and buttons within text and listings in a document. These
buttons are added by special codes embedded in the document An
AmigaGuide file is nothing more than a text file with some special
codes in it. You can create it with Ed, CygnusED ( CED ) GoldEd or
any plain ASCII text editor.
The controls at the top of the AmigaGuide document are added
automatically by the AmigaGuide system.Normally the window will
open on the Workbench,and assume the largest size possible but you
can resize it and push it backwards and forwards
as necessary....
OK NOW THE CLEVER STUFF:
Creating an 'example' AmigeGuide document
-------------------[start example]
@database "example" @author
"John Kennedy" @(c)
"Copyright _ 1992
Commodore-Amiga, Inc. &
1994 John Kennedy" @SVER:
Example 0.1 ( 14/10/94 )
@wordwrap
@Node Main "Welcome"
@{b}@{fg highlight}The CU Amiga Example Document @{fg
text}@{ub}
@{" 1. Button 1 " link ex-1}
@{" 2. Button 2 " link ex-2}
@{" 3. Button 3 " link ex-3}
@ENDNODE
-------------------[end example]
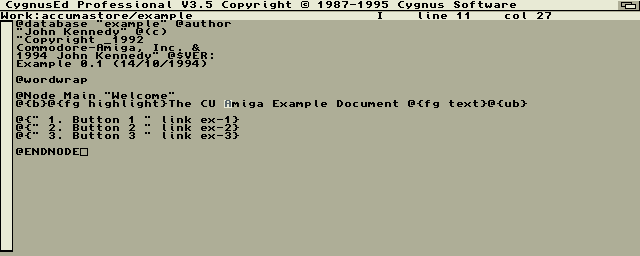
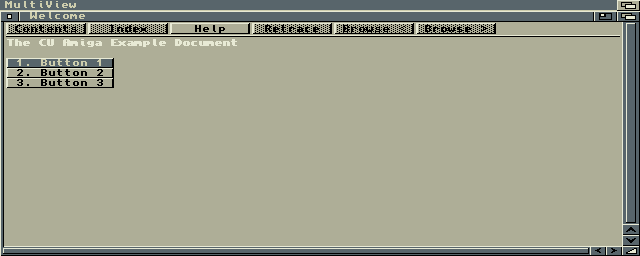
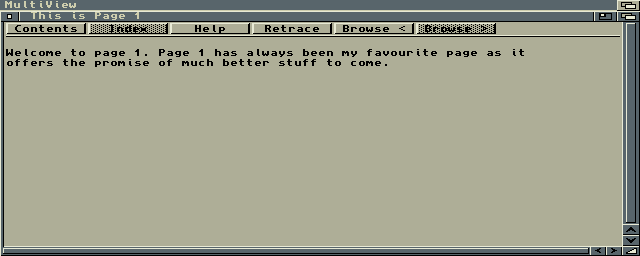
When you fire up MultiView and load the
AmigaGuide it should look like the image below.
As you can see, the special AmigaGuide codes appear after the "@"
signs. There are two types - commands like 'database`
and 'wordwrap', and attributes: which are always enclosed in curly
brackets. Some codes are pretty obvious, others need a little more explanation.
The file must start with the Database word. The Database is simply the
name of the file, and the author ( Thats you ). This sort of
information is only entered once at the start if the file - think
of it as a way of keeping track of your AmigaGuide experiments.
AmigaGuide works by creating different 'pages' of information. These
pages contain text, but also link to other pages. Whenever you
click on the links the relevant page is displayed. It is also
possible to move between pages using the buttons at the top of the
page, but this is handled automatically.
Each page is called a 'node' in AmigaGuide parlance and to create one
you simply use the command @Node followed by the node name and
title of the new page.
In the example the Node is called 'Main' because it will be the first
page Main or nothing will be displayed ! The title will appear in
the title bar of the AmigaGuide window.
Every node must have a matching Endnode, and sure enough, that's the
last line in the example. In between Node and Endnode, there are a
few tricky looking lines.
The first line after Node isn`t so bad when you realise that everything
in the curly brackets is a special AmigaGuide attribute code ( see
later ) You should be able to see that this line switches on bold
text, and then alters the colour.
The text is then displayed on-screen and the bold and colour modes
switched off. It is important to remember that any text that
appears by itself, without codes, will be displayed on screen.
The next three lines are all links to other (currently non-existent
nodes ). At this point it becomes obvious that planning your document
from the outset is important, and it is worth sketching down a few ideas.
Are you going to have the entire thing menu driven from the start ?
This is quite a good way - all you need to do is create a link to
every page in the document and the user will quickly and easily be
able to find their way to it.
Alternatively, you might want to create plain text, with occasional
words acting as links - this approach is called 'hypertext' or non-
sequential reading' and it is useful when you use a lot of jargon
in your work. If the user wants more information they can click on the
high-lighted word and a page containing more information or a
definition will be displayed.
Finally, you may want to create gadgets at the bottom of the
page for navigation purposes. For example, in a maze game the words
would be North, South, East and West and a click on each would bring
the reader to a new page containing a new description of your surroundings.
You might want to use to be able to skip several pages by creating
a fast forward and reverse button at the bottom of the page.
The best documents are a collection of all three methods . If you have
time , it is especially useful if you include an aphabetical index
in your document, highlighting all the important words and phrases
- more on this later.

Click Above to view the various Libraries
and ToolTypes that you need on your system to view
and AmigaGuide document.
ADDING BUTTONS:
The first link line in the document looks like this:
@{" 1. Button 1 " link ex-1}
The text in the quotation marks is the text which will be highlighted
onscreen: the text which the user can click on with the mouse. The
text after the word 'link' is the name of the node that the
AmigaGuide system should move to and display if the text is clicked.
In the following example if the user clicks on the text '1. Button 1'
then the node/page called 'ex-1' will be displayed
Here is the example again, but this time with a new node which can
be jumped to:
-------------------[start example]
@database "example" @author
"John Kennedy" @(c)
"Copyright _ 1992
Commodore-Amiga, Inc. &
1994 John Kennedy" @SVER:
Example 0.1 ( 14/10/94 )
@wordwrap
@Node Main "Welcome"
@{b}@{fg highlight}The CU Amiga Example Document @{fg
text}@{ub}
@{" 1. Button 1 " link ex-1}
@{" 2. Button 2 " link ex-2}
@{" 3. Button 3 " link ex-3}
@ENDNODE
@node ex-1 "This is Page 1"
Welcome to Page 1. Page 1 has always been my favourite page,
as it offers the promise of much better stuff to come.
@endnode
-------------------[end example]
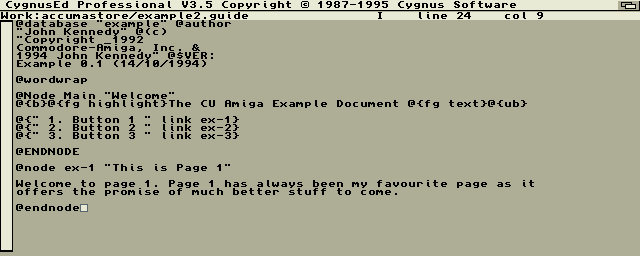
Edit the lines using CED to look like this
And in AmigaGuide it should look like the image below.
You can continue to add more and more pages like this. In fact, you
might find it easier to write the text first, and then go back and
add all the AmigaGuide codes. There are even some utility programs
which attempt to make converting existing documents into AmigaGuide
format easier.
Adding links to words which are contained in sentences isn`t hard. Here
is how to add another link to the word 'promise'.
Welcome to Page 1. Page 1 has always been my favourite page, as it
offers the @{"promise" link promise-page} of much better stuff to come.
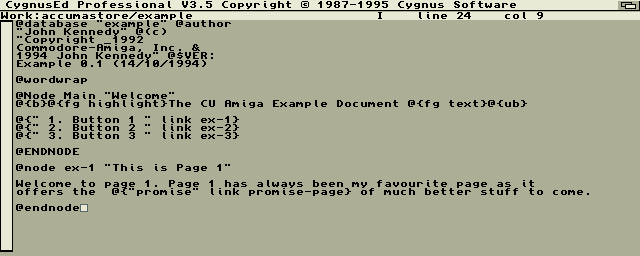
Edit the lines using CED to look like this
And in AmigaGuide it should look like the image below.

You can see that the text 'promise' will become highlighted, and
clicking on it will move to the page called 'promise-page'. This is
how you can create a list of definitions for words.
The buttons at the top of the screen incluse two called CONTENTS and
INDEX. The Contents button will light whenever the user moves away
from the MAIN page - and if they click on it, the main page will be
redisplayed. In this way, no matter where they are in the document
there is always a quick way back home to the start. Likewise, if
you create an index page make sure to call it index. If you do, the
index button will light and the user can move there immediately as
well.
[ END Current TUTORIAL: ]
If you can only see this CONTENT window
then click the image above for the full site
Last updated 07/10/06