Commodore Amiga Retro
![]()
So you bought an A1200
What next ?
Day One
|
I won a Commodore 1200 on Ebay last week.. This was interesting cus I think the guy listed it incorrectly, and consequently I got an A1200 plus goodies for Ł11. Anyway, I opened the big box today, and its not a Commodore, its an Amiga A1200HD. I thought, surely not a hard-drive. Anyway, I just fired her up and she`s got a 80MB hard-drive in. Very quiet also. One partition filled with games, and the Workbench, well the Workbench is a bit of a mess. Sadly the guy has screwed the case back together and punched the screws through the front face, and the LED lights don`t work. No probs especially when you think for Ł11 I also got the following..
Amiga A1200HD 80MB hard-drive ( making it a new revision machine )
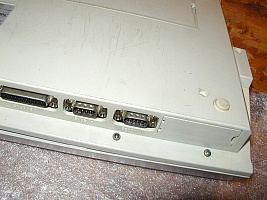
Day TwoThe A1200. The ultimate retro machine. Why?If you read my post for `Day One` you will see that I won this A1200 for Ł11 and today I`ve been messing around getting her straight. A few disappointments, the case has these screw marks at the bottom, the LED lights don`t work and the floppy is faulty. Anyway, that aside I give the keyboard a good clean, banged on another floppy drive, slapped in a 4MB RAM card through the PCMCIA and connected a Phillips monitor. She`s just fine. Next I needed to tidy up the hard-drive. To do this I needed to check the ASSIGNS on the machine. Already I noticed some faulty assigns. Anyway, I copied CED, the ultimate text editor, onto the machine, and going into the user-startup noted that the guy once had FIFA soccer on the machine. So I stripped out the lines and saved. Whilst there I created an ASSIGN for DOpus and loaded that, plus Icon Copy onto the machine. Icon Copy is great for customising icons so you feel more at home. ( I like my own icons ) Now I`m firing on rocket fuel. I can check all the files on the machine through DOpus and iconify any rogue drawers. A swift change of font and workbench colours and hey-presto she`s good as a new-one. To celebrate I play a bit of Elite II. Just wonderful. I`ll get a new floppy and I have some spare LEDs lying around. I`ll also get an accelerator for her and that`s all I need to make this Amiga into a classic Retro machine. As to the keyboard, well, I give all my A1200s a name so this one is gonna be called `Spike` so the marks on the keyboard can stay. So why is the Amiga A1200 the bestest, greatest, most wonderful retro machine ever. I think I`ve answered that haven`t I. No other machine will expand as quickly, tune up as quickly, use extra floppy drives so easily, and run some of the greatest games ever created for a computer console. And most important this is a computer, and there are literally thousands of expansions, games, peripherals on the market to feed your Miggy. I never worry about busted parts, cus a) they are easy to get hold of and b) they are so easy to fit. The only other classic retro machine in the same class is the A500. With both these machines in your collection you really couldn`t ask for much else. And so I believe that that was Ł11 well spent. You probably won`t be so lucky as I but for say Ł35 you can get a decent A1200. Your shopping list can grow in time, but if your just up for playing Sensible Soccer then plug her into the telly. For added beef I`d contemplate the following. A 1084 monitor or the Phillips monitor. Extra RAM, not necessarily acceleration say 4MB RAM. A joystick, preferably the Quickshot brand. A hard-drive minimum 500MB. The Phillips and 1084 have built in sound so no extra speakers. A RAM card with just 4MB is gonna be fine for all your gaming needs. Worms for instance struggles without the memory. The joystick needs to have the longer grip as the smaller stick is a nightmare with Sensi. A 500MB hard-drive gives you min 50MB Workbench and a lot of space for those hd loaded games like Valhalla, Settlers etc. Thats about it.. If you need help with those software tools like CED and DOpus then give us a shout. Other software which is useful is the HDToolbox and DiskSalv. With these on your machine your ready for anything. To celebrate I just won James Pond and Batman on the Bay to give the Miggy something to look forward to. Day ThreeOngoing with the A1200, and a great day in the Amiga Workshop. Got up early to split open the 1200 to see what was going on inside. Found the problem with the LED, two of the wires had been severed by the keyboard casing ( can happen ) when closing the case you trap the very thin wires. Anyway, swapped these out and all works fine now. All looked clean, and the insulating tape on the cradle suggests a user with a bit of knowledge. Thing is the hard-drive had files all in the wrong place, like games in the C directory, and the contents of the storage drawer all over workbench. I think either a novice or kid has been playing with it. Anyway, that took a while to tidy up. Next, I emptied the garbage from the machine to give some nice clear water. Checked the drive with disksalv to see if any goodies has been deleted by previous owner. And sure enough, a couple of great PD games had been deleted Kamikazi chess ( scuse spelling..) A game where you have to lose, and another couple of tiny games, yet to play. Disksalv allows you to scan the drive for deleted files. Next I loaded on DPaint and set the ASSIGNS. Great Amiga paint package, which I use more for animations. Next up was Wordworth which I use for spell checking stuff mainly. After this came VidiAmiga which is great for capturing bits of low res bw video and messing with in DPaint. Up next Techno Sound Turbo 2, a music sample capturer. Great for adding sounds to your keyboard and mouse operation. On the machine then went Amos Professional ( ultra cool ) great program creator. Some say Blitz was better, but to be honest Amos is so user friendly and great for having fun creating your own little games. Hours of fun. At this point I decided to install a few classic games. Ishar 2 which is an all time classic roll playing dungeons and dragons type game. Dreamweb, another roll playing game, this time a somewhat sinister puzzle solving whilst going on a crazed murder spree type game. Up next SWOS or Sensible World of Soccer, and for this I needed the hard-drive installer. So I ventured into the vault and pulled out disk box 21 and there in bright pink were the install disks. The Sensible World of Soccer gives you the opportunity to manage a team from any of the divisions from anywhere in the world and take them as high as you like. You can buy any player as long as you have the money, but beware, fail and you get the sack. There are updates available to make the teams as current as possible. Still very popular. Having done this I decided to add ToolsDaemon to the toolbar so I can launch programs from the drop down menu. I also installed SnoopDOS so I can see where programs fail. Up next I needed to load onto the machine all my icon collections. Thing is these are on HD disks, and the Amiga is DD... so I had to get out of store a PowerXL drive, install the patch and daisy chain another DD floppy on the back, and hey presto I can now read HD PC disks straight from the PC. Starting to feel like a proper Amiga now. So what next .... Maybe plug her into the Microvitec so I can use the multisync facility. Maybe get a small accelerator card so I can free up the PCMCIA , then I can fit the Squirrel interface and use a CDRom. My goodness, how things grow. The next challenge, DATATYPES. many of these can be copied over, some need to be installed. I then need to set up DOPUS so I can read files like GIFS and JPEGS and Bitmaps. Then I will set up a couple of archivers so I can DECRUNCH bigtime and take advantage of files from the web. All that would be left then is a modem and YAM plus the TCP stacker and I`ll be mailing from the machine.
There you go, having fun with the A1200. Creative computing which is very rewarding. And certainly makes you feel like your in control.
Day FourReplacing the floppy drive..
Remember to earth yourself... very important
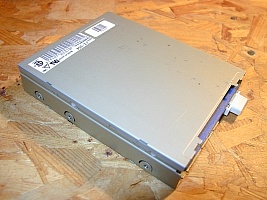
I obtained this replacement DD floppy drive from AmigaDeals.
Next I put down a protective sheet on the workbench to
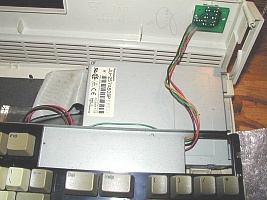
Carefully open the case and lean the top section against an
Did you note the small wires to the LED display which I replaced
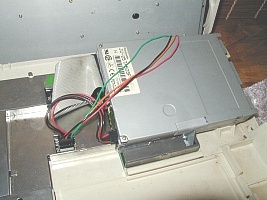
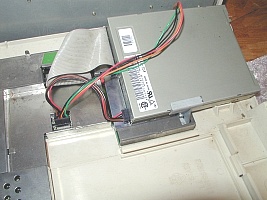
Three components of note are revealed by lifting the keyboard
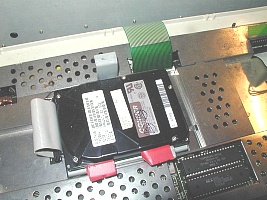
Note the small strips of red insulating tape on the cradle
Next we turn to the floppy removal. Note the cable connectors
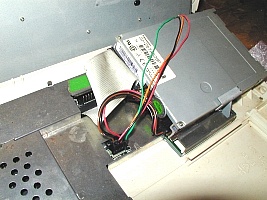
The cable to remove first is the outer connector adjacent
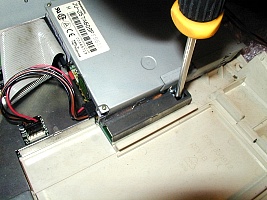
Note the small bracket clamping the floppy in place, this is the
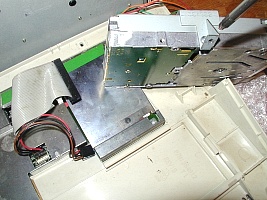
Carefully pull out the ribbon connector and power cable
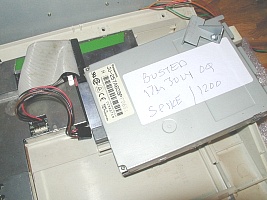
Always mark your broken kit with labels, but never throw
And then simply reverse the procedure and you will have
Having reconnected the computer back together test the
It is interesting to to see how many computer systems are
So you`ve bought an A1200 Wanna know what to do with it ? Wanna know what to do with it ?Here`s what I did with an Ł11 Amiga A1200 from Ebay Days 1 to 3 ~ She`s alive !
|
If you can only see this CONTENT window
then click the image above for the full site
Last updated 07/10/06