Day Seven
Hard Drivin` the A1200
And so today we install both an external SCSI hard drive
and an internal IDE. First up is the SCSI. You may recall
that I fitted a Squirrel interface to the A1200 to take the
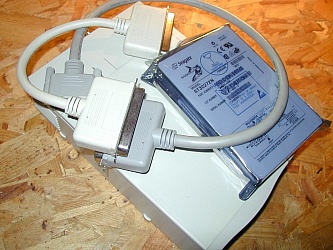
CDRom. Well the external unit that you see in the picture
can piggy-back off the CDRom. For this you need the Centronics
to Centronics cable. If you are taking it from an SCSI Zip you
will need the Centronics to 25pin.
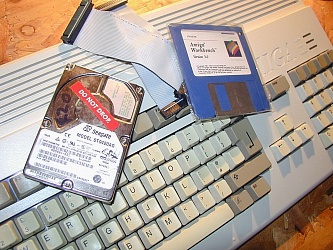
The hard-drive is a Seagate Barracuda ST32272N 2.26GB SCSI
A word of caution on the hard-drive. For the A1200 I would
stay well below 4GB. Fit two drives if you want that kind of
capacity. To be honest 2GB for the Amiga A1200 is going to be
more than ample. Also make sure you get the Narrow 50Pin version
and also make sure that the external box is the narrow 50pin
also.
The number of the drive is very important - ST32272N
With this number you can go on the web and download the PDF
file of the jumper settings. I would only buy a hard-drive
if I had the jumper settings. With Seagate you will find
full details on the web. In this instance I acquired the
pdf of the User Manual and the installation guide, plus
very good images and guidance on the jumper settings
One last thing, get a small Centronics cable. The cable
is quite thick and can be a problem at the back of the Amiga
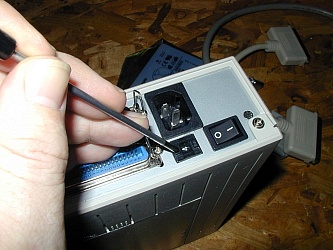
On the back of the hard-drive box you will find the Unit Number
for the SCSI unit. You will need to identify the SCSI box
with a unique number. Press the little button slots either
side of the number to the desired number
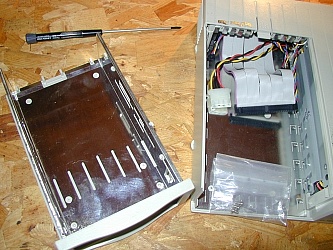
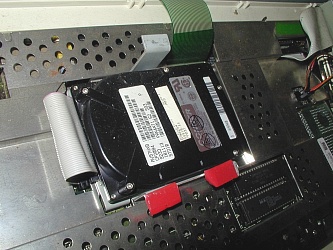
Slide out the bay that holds the hard-drive and check for
screws, ribbon connectors and power leads. There is also the
LED display wires for the hard-drive.
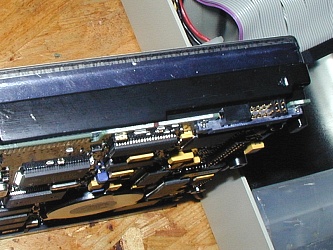
You need to set the jumper setting to the unit of the SCSI
device. Refer to the instructions for the drive. Usually
with no jumpers set its Unit 0, with the two on the right
set this is Unit 3.
You would think ut was a case of fitting the hard drive in the
bay and then connecting up the power and ribbon. My suggestion
is to connect the power and ribbon to the hard drive and then
screw into the bay. The screws I had didn`t fit, so I simply
fetched four screws from my collection. Never throw screws away
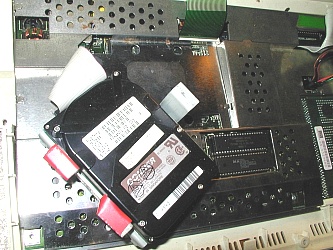
Next you need to close the lid by sliding the bay into the
base unit until it clicks home. You then connect the Centronics
and the power and don`t forget to terminate. In this case I
moved the block from the CDRom. Then connect up to the CDRom.
Time for the technical stuff. When you fire up the Miggy you
most likely will not see the hard-drive. Don`t panic. I couldn`t
see the hard-drive in this case. You need a SCSIsquirrel Toolbox
which is like the HDToolbox for the IDE but customised. I will
put a screen grab on the page later with the settings.
This simply scans for SCSI devices.
I did this first time and didn`t like the way the computer
was scanning the CD device first, so I simply reversed all the
connections on the SCSI so that the hard-drive was first on the
chain. You can have problems with, say ZIP drives first on the
chain as they auto switch off when no disk activity. I have had
a hard-drive fail cus of this, so I decided to put the hard-drive
first on the chain.
The chain: Squirrel from PCMCIA to hard-drive Unit 3; to CDRom
Unit 0 and then to termination block.
Next I fired up my SCSIToolbox and it found no hard drive, so
I updated the list and against Unit 3 I found the Seagate.
I then partitioned the drive, it was already set at two 1GB
drives so I left it at that. DO NOT I repeat DO NOT low level
format under any circumstance. Simply save and exit. Then reboot
Having rebooted you will see two non-DOS partitions. Simply
highlight one at a time and format. Forget the trashcan and set
to Fast File System. You can use International Mode also
if you like. Also name the partition. Then after a reasonable
amount of time ( several minutes ) you will see your drive
You format from the drop down Workbench menu and not from
the HDToolbox or any other prepping device you may have
Simply format as if it were a floppy disk.. A FULL FORMAT
You will need to add an icon to the drive known as disk.info
To do this go into DOpus and copy a disk.info across from
a current VOLUME and use IconCopy to change the image if you
so desire. You cannot change the icon without an info file
attached to the VOLUME . Thats the Amiga rule. Applies to
drawers and tools just the same.
All done. You should have two new sexy Volumes. All you need
to do now is to drag both your Work and Workbench partitions
into one of your new VOLUMES so that you can copy these in
advance of your next installation... the internal IDE replacement
You need to make a copy of your old IDE so that you can
transfer files without re-installing
So grap your new IDE 2.5", your Workbench disk and some
spare longer ribbons just in case
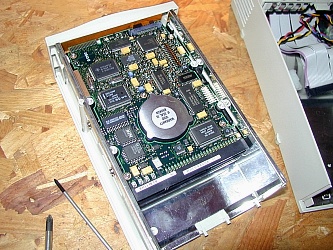
Open up the A1200 on a protective bubble plastic sheet and
lean the keyboard vertical. Be careful not to pull out the
green ribbon connector to the keyboard, and watch those LED wires
Earth yourself and make sure the Amiga is not still connected
to the electric. Locate the hard-drive and remember which way the
ribbon is fitted, ie red edge to the top of the machine
Simply lift the cradle out of the sockets on the motherboard
Then gently ease the hard-drive ribbon off the old drive
If you look at the end of the drive, there are four small pins
all on their own. These are not used, and helps you locate the
connector.

You unscrew the hard-drive from the cradle and reverse the
process when you put the new one back in. Be very careful when
inserting the drive ribbon connector back in. Do not bend or
break any pins
Having rebuilt the A1200 plug everything back together again
and fire up WITH THE WORKBENCH DISK. You have no idea whats
on the drive so use the WORKBENCH floppy. Having checked the
contents of the hard-drive, you need to reinstall the SCSI
drivers as we did for the CDRom in the last tutorial. With
this done reboot on the floppy, and like magic the SCSI CDRom
and SCSI hard-drive will be working.
Copy over DOpus and CygnusED and edit the user-startup to
assign DOPUS, making sure you put the Dopus Library in the
LIBS directory. Reboot again on the floppy, and fire up DOpus
and copy your files from the saved sections on your new SCSI
hard-drive.
Then reboot one last time, this time from the hard-drive, and
like magic you will have a new hard-drive working at the brain
of the Amiga. Cool beans
I now have five ( 5 ) partitions on the machine and enough
room to get lost in. I still have one 1GB hd to fit on a box
but I`m in no hurry.
In the next tutorial I will show you how to install a modem
MUI, YAM, get on-line and email. Plus I will show you how to
create and install your own RAM image.
And so the Ł11 Amiga A1200 is now kitted with:
A new internal floppy drive
An external high density drive
An external second floppy drive
A Microvitec monitor
A Blizzard 1230IV Turbo accelerator with 32Mb RAM
A Squirrel interface
A Power Computing CDRom
An external SCSI bay with a 2.1GB Seagate drive
A replacement 450Mb internal IDE
It just gets better and better
 Wanna know what to do with it ?